Lets reset the timing on your 1.8L 8V!
This page is dead. The pics were
lost, sorry!
Part One
Crank shaft
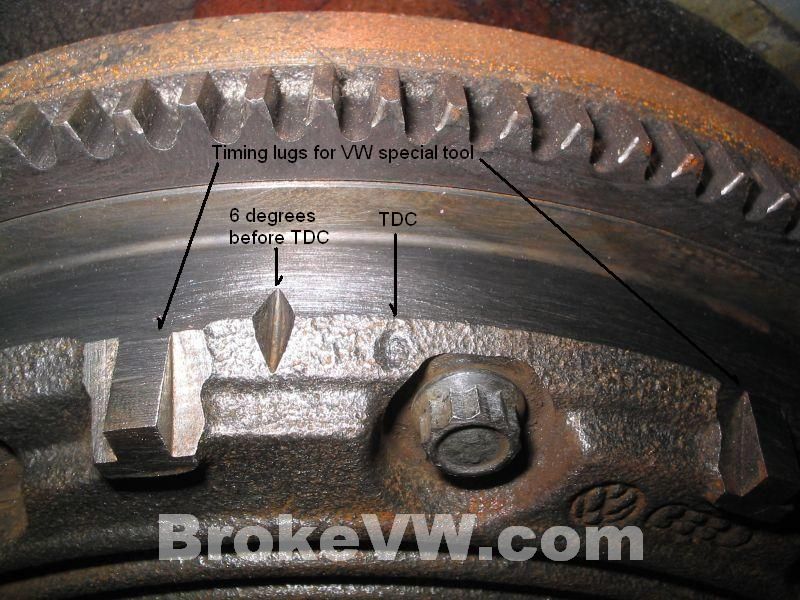
Start by rolling the car until you see the
timing marks on your flywheel, as shown in this pic....

Before we can see those marks, this plug needs removed from the top of the
transmission...

...and to remove it, you need something that is a 27mm hex, like a homemade
tool as shown here...

Those marks on the flywheel look like this
when the flywheel is exposed...
To get the flywheel in the spot you need it in, remove the green plug as
shown, and put the car in 5th gear, and roll the car forward by hand until
the marks roll around and the pointer is pointing at the 0-degree dot on the
flywheel.
This will tell you the #1 piston is at TDC (Top Dead Center). That is the
piston closest to the belts.
This means the piston is at the very top of its stroke, BUT, we don't know
if this is the point where the fuel mixture is fired, or if the exhaust
gases are being expelled. In other words, we don't know the cam
timing.
Cam shaft
To get the cam where we need it, use this mark, after removing the
timing
belt cover...

When lined up like shown, the dot on the inside of the gear face should be
level with the top of the valve cover. The cam will be spun so that both the
valves for the #1 cylinder are closed. The piston has raised to the highest
point, and both valves are closed....this is the compression stroke.
On a side note, the cam gear is the same gear that is used for the
intermediate shaft, so your cam gear might have another dot mark on the
outside face of the gear, as shown in the pic, or it could have both the dot
in the pic and a second mark of 'O/T' on the gear, which is Oben/Top (oben
being top in german)...

You don't want to get a cam gear and I/S gear mixed up, because the
timing
will be off and the marks will drive you nuts until you figure out to flip
one gear around. If it is one of the newer gears with 'O/T', it is easier to
figure out, but with older gears as shown, both marks on each side of the
cam gear is a dot, so it can be tricky to figure out.
One way to tell with a quick glance if the
gear is on the correct way is to look where the dot is. As pointed out by
kjritchey on the Vortex, the dot for the cam
timing will be located between 2 teeth. The dot for the I/S
timing will be on the raised tooth, as shown in the two pictures
above.
Now, we know the piston is at TDC and we know it is at TDC on the
compression stroke and not the exhaust stroke.
It is on the compression stroke that the spark plug fires to make the
explosion and drive the piston down, then it comes back up and pushes the
exhaust gas out, and that is the exhaust stroke. The spark plug fires once
near the top of every compression stroke.
Intermediate
shaft
The intermediate shaft is "timed" when the crank pulley notch is aligned
with the dot shown here on the I/S pulley....

That aligns it per Bentley, and the Bentley can explain how to loosen the timing belt so you can align the I/S gear, if you want.
The I/S can really be anywhere, it doesn't
truthfully matter, as it does nothing but spin the ignition distributor,
which can be lifted in and out of the block and put in the correct spot
(we'll do that in Part Two), but to be complete, we've shown how the I/S
pulley gets "timed"
You can also see how there is also a mark on the crank pulley showing TDC,
but it isn't as accurate as the flywheel mark, so use the flywheel...

It is also worth noting now that if the car is not running right, and you
are looking into the
timing, check to see that the crank pulley is close to its mark, if
it's not but the flywheel is right, you likely have a crank woodruff keyway
fault.
Now the mechanical aspect of the engine is timed, the valves open and close
at the right times, and the piston is up and down at the right time. We need
to adjust when the plug sparks and lights the fuel. VW states it should be
at 6 degrees before TDC meaning that the plug fires just before the piston
gets to the top.
The marks shown earlier on the flywheel show you where TDC and 6BTDC are
located. Using a timing
light, we'll adjust the point at which the plug fires in Part Two of
Timing.
Part Two
In Part One, we covered placing the mechanical chunks of the engine into the
right spots to begin the task of resetting the
timing, now we need to adjust when the plug fires. To do this, we
turn the distributor...
In order to get that turned, this 13mm bolt
needs loosened...

...and it will allow the dizzy to be
twisted. To cover all aspects, we'll start like the car had no distributor
in it, and one has been bought and needs installed.
Spin the gear and rotor button until the rotor points to this line on the
dizzy body...

Here is a close-up of that line on the
distributor body...

This means when the cap is installed, the
rotor will be aligned to fire #1 plug. Drop the dizzy into the hole, but
notice the bottom of the dizzy shaft is much like a flat-blade screwdriver
tip, and if you look inside the hole, you will see the top of the oil pump
shaft, with a slot to accept the distributor shaft....

Use
a screwdriver to turn the oil pump shaft until the slot is aligned with the
dizzy shaft you are trying to insert.
You'll find the helical gears will cause the rotor to move as it drops in.
To counter this, turn the rotor backwards a bit, so the twisting of the
helical gears will spin the rotor to the right position as shown earlier.
Now it's time to pop the cap on and attach the wires. You know the line on
the dizzy body is #1, and if you look down on the dizzy, it spins clockwise
if you look down on the rotor, like this...

Knowing where #1 is, and which way the
rotor turns, and that the firing order is 1-3-4-2, you know where the wires
go and can now forget about ever mixing them up!
Here are pics showing the tab on the distributor cap, the notch for the tab
on the dizzy body, and then the location of the tab in relation to the
terminals on top...


Align all the engine parts, put the rotor to the line in the dizzy, put the
cap and wires on, and attach your
timing light.
Adjust the 13mm clamping bolt shown earlier so the dizzy can just be twisted
by hand, but not so loose it turns too easily, because of engine vibrations.
Start the engine, and with the
timing light pointing into the bell-housing, the light should be
flashing and the pointer pointing to the ZERO mark on the flywheel.
Turn the distributor CCW to make the spark plug occur earlier in the piston
stroke, until the pointer on the trans casing is pointing at the diamond
shaped 6BTDC mark.
To cover the other side of sticking the dizzy in, here is a pic showing the
cap being popped off using 2 different methods of unhooking the clips...


...and to get the dizzy out, remove the
13mm and clamp, and lift it out, unless it is stuck, then oil, and twist,
and hope, and if that won't work, beat it to death with a hammer.
That should cover most of the
timing questions, from mechanical
timing, to ignition
timing, and the differences between the 2, and how to set them and
adjust the ignition timing.